连接前准备:
- Python 开发环境
- DB-API驱动:irispython wheel 文件
- Connection String
步骤:
步骤:
InterSystems IRIS是一个伟大的数据平台,它满足了当前市场所需的功能。在这篇文章中,你可以看到我心目中的前10大功能:
嗨,开发者们。
不要错过这个由InterSystems Healthcare副总裁@Donald.Woodlock主持的动手实践环节:
⏯ Machine Learning 201 - Neural Networks and Image Recognition
在这篇文章中,我试图找出多个领域来开发我们能够使用python和机器学习的功能。
每家医院都在努力利用技术和服务来提高其服务质量和效率。
医疗保健部门是一个非常大的、可供选择的服务领域,而python是做机器学习的最好技术之一。
在每个医院里,人们都会有一些感觉,如果这种感觉能够被计算机理解,使用技术就有机会提供更好的服务。
在这里,我们可以把这两者结合起来,在医疗部门,我正试图理解/识别各种选择,以提供更好的服务。
首先,我们可以尝试使用python的机器学习来识别人并了解他们目前的感受。比如,在医院信息系统中,每个病人至少有一张照片,使用该照片我们可以识别病人,然后一旦病人到达医院,使用视频监控和机器学习技术需要识别这个人的感觉。
在医院设施中会看到多种类型的感觉。
1)紧张
2)平静和冷静
3) 哭泣
4) 暴力的病人/亲属
5) 生病的病人
6) 高烧鉴定
像上面的情况,我们可以看到多种不同的类型。
如果一个已经登记的病人发高烧,那么使用闭路电视识别这个病人的情况,并捕捉温度热像仪,护理人员可以给予更好的支持,这在接待服务领域是非常大的区别。
如果这个发高烧的人已经是一个登记的病人,如果利用现有的照片识别这个病人,那么我们可以做多件事情。
1)如果该病人今天有预约,我们可以自动到达该病人处。
InterSystems Native SDK for Python是 InterSystems IRIS APIs 的轻量级接口,曾经只能通过 ObjectScript 使用。
准确地说,我对调用 ObjectScript 方法、类方法的能力特别感兴趣。它可以工作,而且效果很好,但默认情况下,调用只支持标量参数:字符串、布尔值、整数和浮点数。
但如果你想:
- 传递或返回结构,例如字典或列表
- 传递或返回流
您需要编写一些粘合代码或使用这个project (使用 pip install edpy 安装)。 edpy 包会给你一个简单的签名:
它允许您调用任何 ObjectScript 方法并返回结果。
像这样导入它:
call accepts 4 required arguments:
- iris - a reference to an established IRIS object
- class_name - IRIS class to call
- method_name - IRIS method to call
- args - list of 0 or more arguments
参数
每个参数可以是以下其中之一:
这是一个在InterSystems IRIS中用python和objectscript建立的对比测试。
测试目的是比较在python和objectscript中从BP到BO来回发送一千条请求/消息的速度。
更多信息,请访问 https://github.com/LucasEnard/benchmark-python-objectscript。
重要提示 : 这里用的是python, graph objectscipt和objectscript从一个BP到一个BO来回发送1000条消息的时间,单位是秒。
字符串信息是由十个字符串变量组成。
对象信息由十个对象变量组成,每个对象都是它自己的int、float、str和List(str)。
| 消息字符串 | 1000条消息来回的时间 (秒) |
|---|---|
| Python BP | 1.8 |
| BPL | 1.8 |
| ObjectScript | 1.4 |
| 消息对象 | 1000条消息来回的时间 (秒) |
|---|---|
| Python BP | 3.2 |
| BPL | 2.1 |
| ObjectScript | 1.8 |
行中函数的时间是列中函数的x倍 :
| 消息字符串 | Python | BPL | ObjectScript |
|---|---|---|---|
| Python | 1 | 1 | 1.3 |
| BPL | 1 | 1 | 1.3 |
| ObjectScript | 0.76 | 0.76 | 1 |
例如,第一行告诉我们,Python字符串的时间是Objectscript图形字符串函数的1倍,是Objectscript字符串函数的1.3倍。
( 利用第一个表格,我们可以验证我们的结果 :
1.3 * 1.4 = 1.8
1.3是第一行最后一列表格中的x,1.4s是本节第一个表格中看到的objectscript中的字符串信息的时间,1.8s实际上是python中的字符串信息的时间,我们可以通过寻找本节第一个表格或通过前面所示的微积分找到。)
行中的函数有列中函数X倍的时间:
| Messages objects | Python | BPL | ObjectScript |
|---|---|---|---|
| Python | 1 | 1.5 | 1.8 |
| BPL | 0.66 | 1 | 1.2 |
| ObjectScript | 0.55 | 0.83 | 1 |
嗨,开发者们!
看看你如何用PyODBC和Native API在Python中开发并连接到InterSystems IRIS®数据平台。
⏯ Using Python to Connect to InterSystems IRIS
<iframe allow="accelerometer; autoplay; clipboard-write; encrypted-media; gyroscope; picture-in-picture" allowfullscreen="" frameborder="0" height="315" scrolling="no" src="//player.bilibili.com/player.html?aid=684120686&bvid=BV1zU4y1m7h7&cid=718939082&page=1" width="560"></iframe>欢迎大家来我们的 Bilibili主页观看更多视频!

这篇文章是对我的 iris-globals-graphDB 应用的介绍。
在这篇文章中,我将演示如何在Python Flask Web 框架和PYVIS交互式网络可视化库的帮助下,将图形数据保存和抽取到InterSystems Globals中。
 #create and establish connection
  if not self.iris_connection:
         self.iris_connection = irisnative.createConnection("localhost", 1972, "USER", "superuser", "SYS")

  # Create an iris object
  self.iris_native = irisnative.createIris(self.iris_connection)
  return self.iris_native
#import nodes data from csv file
isdefined = self.iris_native.isDefined("^g1nodes")
if isdefined == 0:
with open("/opt/irisapp/misc/g1nodes.csv", newline='') as csvfile:
reader = csv.DictReader(csvfile)
for row in reader:
self.iris_native.set(row["name"], "^g1nodes", row["id"])
#import edges data from csv file
isdefined = self.iris_native.isDefined("^g1edges")
if isdefined == 0:
with open("/opt/irisapp/misc/g1edges.csv", newline='') as csvfile:
reader = csv.DictReader(csvfile)
counter = 0
for row in reader:
counter = counter + 1
#Save data to globals
self.iris_native.set(row["source"]+'-'+row["target"], "^g1edges", counter)
 #Get nodes data for basic graph
  def get_g1nodes(self):
        iris = self.get_iris_native()
        leverl1_subscript_iter = iris.iterator("^g1nodes")
        result = []
        # Iterate over all nodes forwards
        for level1_subscript, level1_value in leverl1_subscript_iter:
            #Get data from globals
            val = iris.get("^g1nodes",level1_subscript)
            element = {"id": level1_subscript, "label": val, "shape":"circle"}
            result.append(element)
        return result
    #Get edges data for basic graph
    def get_g1edges(self):
        iris = self.get_iris_native()
        leverl1_subscript_iter = iris.iterator("^g1edges")
        result = []
        # Iterate over all nodes forwards
        for level1_subscript, level1_value in leverl1_subscript_iter:
#Get data from globals
            val = iris.get("^g1edges",level1_subscript)
            element = {"from": int(val.rpartition('-')[0]), "to": int(val.rpartition('-')[2])}
            result.append(element)
        return result
<script type="text/javascript">
    // initialize global variables.
    var edges;
    var nodes;
    var network;
    var container;
    var options, data;

    // This method is responsible for drawing the graph, returns the drawn network
    function drawGraph() {
        var container = document.getElementById('mynetwork');
        let node = JSON.parse('{{ nodes | tojson }}');
        let edge = JSON.parse('{{ edges | tojson }}');

        // parsing and collecting nodes and edges from the python
        nodes = new vis.DataSet(node);
        edges = new vis.DataSet(edge);
        // adding nodes and edges to the graph
        data = {nodes: nodes, edges: edges};        var options = {
            "configure": {
                "enabled": true,
                "filter": [
                "physics","nodes"
            ]
            },
            "nodes": {
                "color": {
                  "border": "rgba(233,180,56,1)",
                  "background": "rgba(252,175,41,1)",
                  "highlight": {
                    "border": "rgba(38,137,233,1)",
                    "background": "rgba(40,138,255,1)"
                  },
                  "hover": {
                    "border": "rgba(42,127,233,1)",
                    "background": "rgba(42,126,255,1)"
                 }
                },                "font": {
                  "color": "rgba(255,255,255,1)"
                }
              },
            "edges": {
                "color": {
                    "inherit": true
                },
                "smooth": {
                    "enabled": false,
                    "type": "continuous"
                }
            },
            "interaction": {
                "dragNodes": true,
                "hideEdgesOnDrag": false,
                "hideNodesOnDrag": false,
                "navigationButtons": true,
                "hover": true
            },            "physics": {
                "barnesHut": {
                    "avoidOverlap": 0,
                    "centralGravity": 0.3,
                    "damping": 0.09,
                    "gravitationalConstant": -80000,
                    "springConstant": 0.001,
                    "springLength": 250
                },                "enabled": true,
                "stabilization": {
                    "enabled": true,
                    "fit": true,
                    "iterations": 1000,
                    "onlyDynamicEdges": false,
                    "updateInterval": 50
                }
            }
        }
        // if this network requires displaying the configure window,
        // put it in its div
        options.configure["container"] = document.getElementById("config");
        network = new vis.Network(container, data, options);
      return network;
    }
    drawGraph();
</script>
#Mian route. (index)
@app.route("/")
def index():
    #Establish connection and import data to globals
    irisglobal = IRISGLOBAL()
    irisglobal.import_g1_nodes_edges()
    irisglobal.import_g2_nodes_edges()
    #getting nodes data from globals
    nodes = irisglobal.get_g1nodes()
    #getting edges data from globals
    edges = irisglobal.get_g1edges()    #To display graph with configuration
    pyvis = True
    return render_template('index.html', nodes = nodes,edges=edges,pyvis=pyvis)
下面是关于此项目的 介绍视频:
<iframe allow="accelerometer; autoplay; clipboard-write; encrypted-media; gyroscope; picture-in-picture" allowfullscreen="" frameborder="0" height="315" scrolling="no" src="//player.bilibili.com/player.html?aid=256588464&bvid=BV1LY411w7MU&cid=718938724&page=1" width="560"></iframe>欢迎大家来我们的 Bilibili主页观看更多视频!
谢谢!
我们很高兴与你分享有趣的信息,以及告诉你为什么Python是好的,它被用在哪里。
其中使用最多的库是NumPy和Pandas。NumPy(Numerical Python)用来对大型数据集进行分类。它简化了数组上的数学运算及其矢量化。Pandas提供两种数据结构:系列Series(一个元素列表)和数据框架DataFrames(一个有多列的表格)。这个库将数据转换为数据框架,允许你删除和添加新的列,以及执行各种操作。
Python为数据分析项目提供了无数的工具,可以帮助完成任何任务。
Hello 社区成员们,
这篇文章是对Muhammad Waseem的 OpenExchange IRIS-Python-Apps 应用程序的介绍。 使用嵌入式 Python 和 Python Flask Web 框架构建。
pyodbc是一个开源的Python模块,可以利用ODBC来访问底层数据库。InterSystems支持使用pyodbc作为使用关系模式从Python访问数据库的一种方式。这个模块也可以用于InterSystems IRIS的早期版本。
这个概念旨在展示iris互操作性框架如何与嵌入的python一起使用。
import grongier.pex
import iris
import MyResponse
class MyBusinessOperation(grongier.pex.BusinessOperation):
def OnInit(self):
print("[Python] ...MyBusinessOperation:OnInit() is called")
self.LOGINFO("Operation OnInit")
return
def OnTeardown(self):
print("[Python] ...MyBusinessOperation:OnTeardown() is called")
return
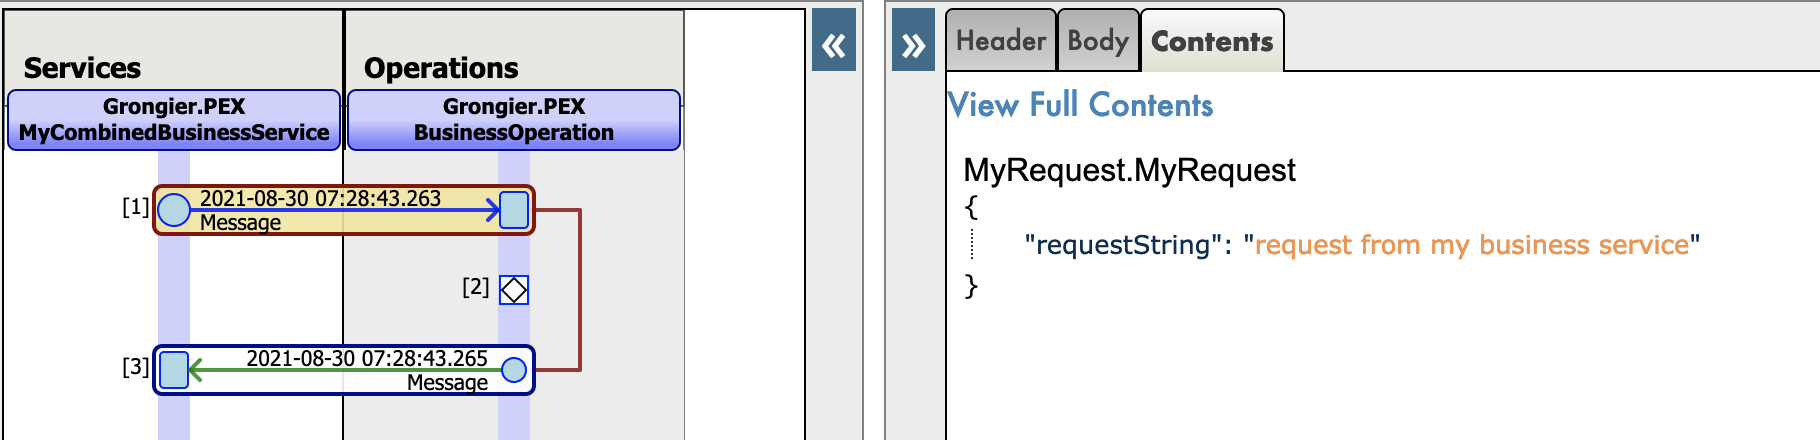
def OnMessage(self, messageInput):
if hasattr(messageInput,"_IsA"):
if messageInput._IsA("Ens.StringRequest"):
self.LOGINFO(f"[Python] ...This iris class is a Ens.StringRequest with this message {messageInput.StringValue}")
self.LOGINFO("Operation OnMessage")
response = MyResponse.MyResponse("...MyBusinessOperation:OnMessage() echos")
return response
不需要 ObjectScript 代码.
多亏Grongier.PEX.Utils.RegisterComponent()方法。
启动一个嵌入式的Python shell:
/usr/irissys/bin/irispython
然后使用这个类方法将一个新的py文件添加到组件列表中,以实现互操作性。
iris.cls("Grongier.PEX.Utils").RegisterComponent(<ModuleName>,<ClassName>,<PathToPyFile>,<OverWrite>,<NameOfTheComponent>)
例如 :
iris.cls("Grongier.PEX.Utils").RegisterComponent("MyCombinedBusinessOperation","MyCombinedBusinessOperation","/irisdev/app/src/python/demo/",1,"PEX.MyCombinedBusinessOperation")
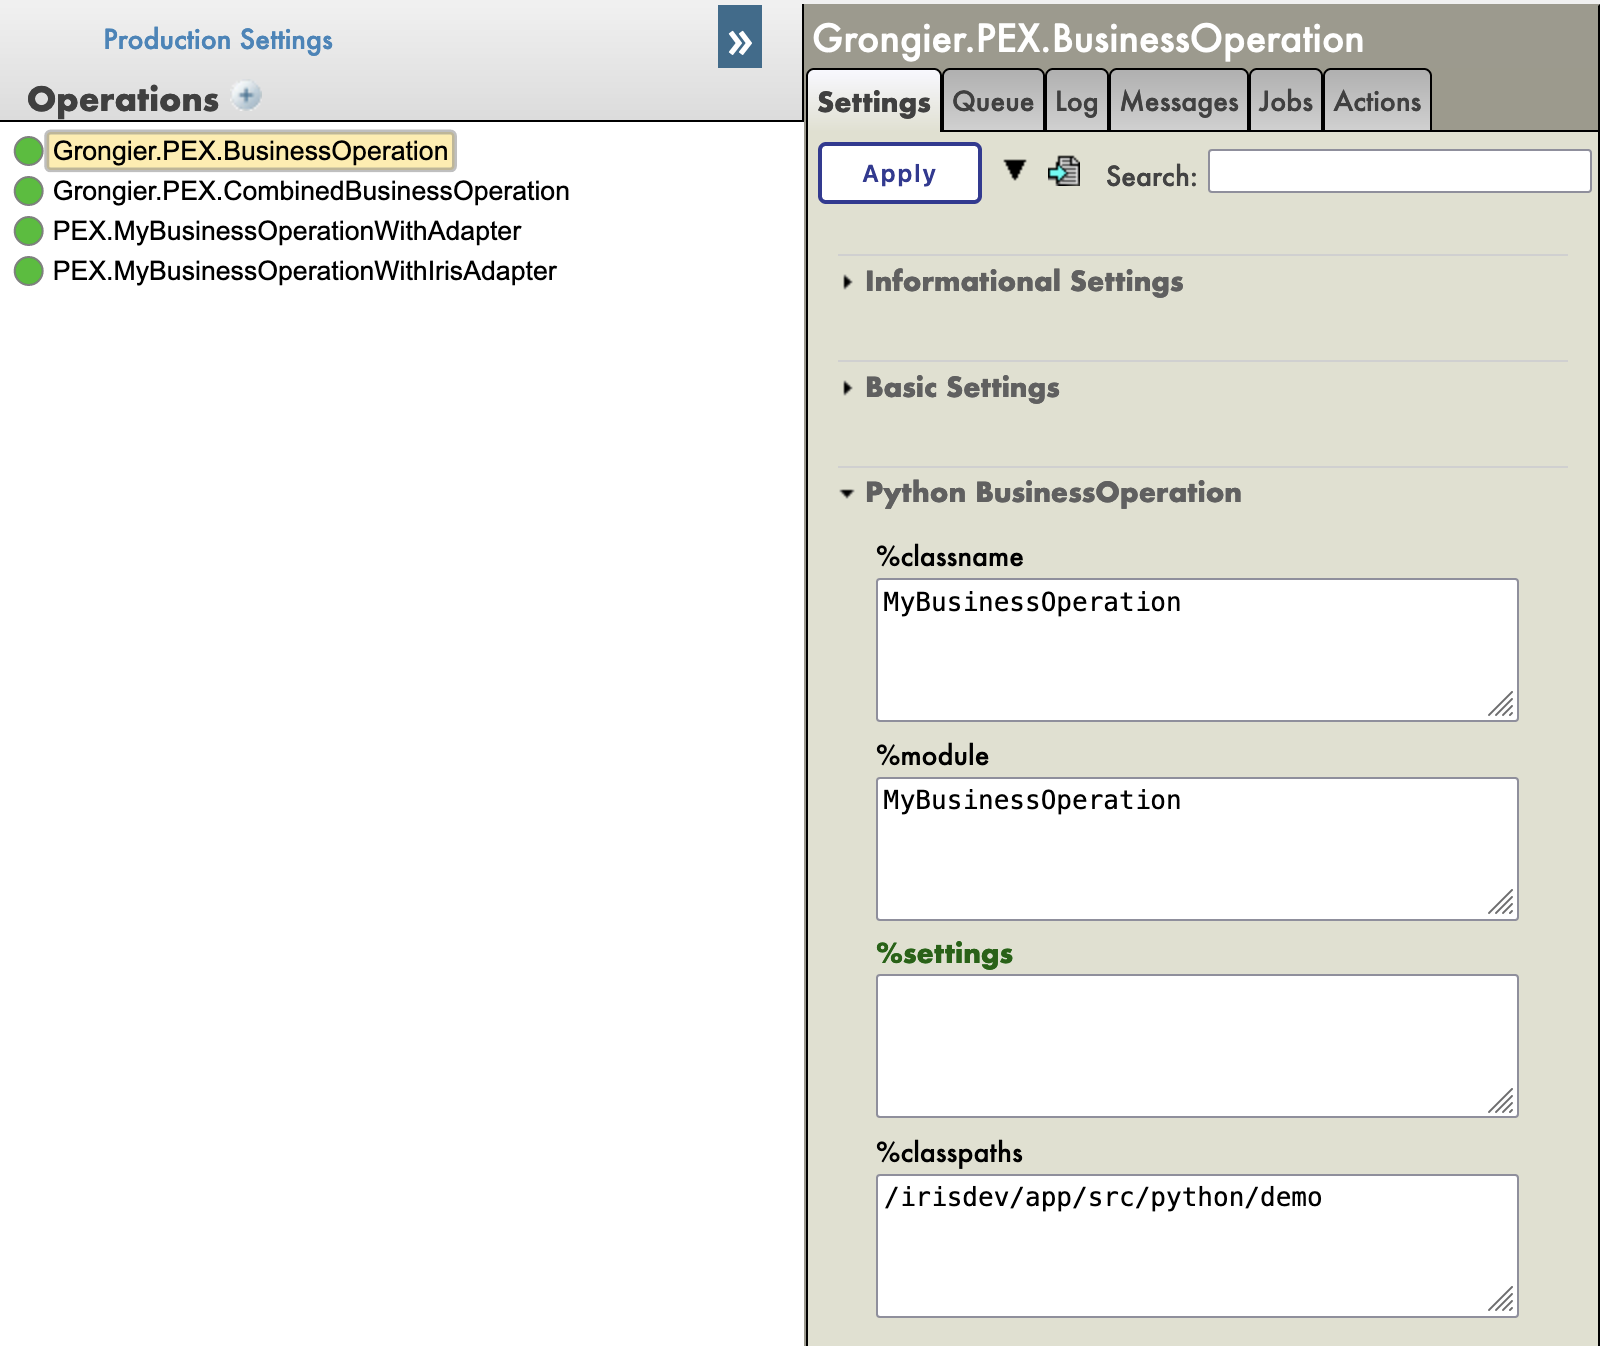
Production有四个Python组件:

为Python本地消息新增json跟踪:
Git和Docker必须已安装
从git拉取repo到本地
git clone https://github.com/grongierisc/interpeorability-embedded-python
在安装路径打开terminal,并运行:
docker-compose build
使用IRIS容器运行你的项目:
docker-compose up -d
在iris 实例上安装 grongier_pex-1.0.0-py3-none-any.whl :
/usr/irissys/bin/irispython -m pip install grongier_pex-1.0.0-py3-none-any.whl
然后,加载ObjectScript类:
do $System.OBJ.LoadDir("/opt/irisapp/src","cubk","*.cls",1)
打开production,并运行。
示例代码会开始运行。
Dockerfile包含在容器中安装一些python的依赖项,例如pip, venv和sudo 然后创建dev目录将git仓库复制进入目录
Dockerfile启动IRIS并导入Titanics csv文件,然后为Python Shell激活**%Service_CallIn**。 可以使用使用相关的docker-compose.yml来轻松地设置额外的参数,如端口号和映射键和主机文件夹的位置。
这个dockerfile以安装python模块的需求结束。
最后一部分是关于安装jupyter notebook和它的内核。
使用.env/文件来调整在docker-compose中使用的dockerfile。
VSCode配置文件 VSCode ObjectScript plugin
VSCode ObjectScript 调试配置文件
如果你想在容器中用VSCode运行,可以添加扩展。

对于使用嵌入式python非常有用。
src
├── Grongier
│   └── PEX // ObjectScript classes that wrap python code
│       ├── BusinessOperation.cls
│       ├── BusinessProcess.cls
│       ├── BusinessService.cls
│       ├── Common.cls
│       ├── Director.cls
│       ├── InboundAdapter.cls
│       ├── Message.cls
│       ├── OutboundAdapter.cls
│       ├── Python.cls
│       ├── Test.cls
│       └── Utils.cls
├── PEX // Some example of wrapped classes
│   ├── MyBusinessOperationWithAdapter.cls
│   ├── MyBusinessOperationWithIrisAdapter.cls
│   ├── MyBusinessOperationWithPythonAdapter.cls
│   ├── MyBusinessService.cls
│   ├── MyOutboundAdapter.cls
│   └── Production.cls
└── python
    ├── demo // Actual python code to run this demo
    │   ├── MyBusinessOperation.py
    │   ├── MyBusinessOperationWithAdapter.py
    │   ├── MyBusinessOperationWithIrisAdapter.py
    │   ├── MyBusinessProcess.py
    │   ├── MyBusinessService.py
    │   ├── MyCombinedBusinessOperation.py
    │   ├── MyCombinedBusinessProcess.py
    │   ├── MyCombinedBusinessService.py
    │   ├── MyInboundAdapter.py
    │   ├── MyLoggingOperation.py
    │   ├── MyNonPollingStarter.py
    │   ├── MyOutboundAdapter.py
    │   ├── MyRequest.py
    │   ├── MyResponse.py
    │   ├── MySyncBusinessProcess.py
    │   └── SimpleObject.py
    ├── dist // Wheel used to implement python interoperability components
    │   └── grongier_pex-1.0.0-py3-none-any.whl
    ├── grongier
    │   └── pex // Helper classes to implement interoperability components
    │       ├── _BusinessHost.py
    │       ├── _BusinessOperation.py
    │       ├── _BusinessProcess.py
    │       ├── _BusinessService.py
    │       ├── _Common.py
    │       ├── _Director.py
    │       ├── _InboundAdapter.py
    │       ├── _Message.py
    │       ├── _OutboundAdapter.py
    │       └── __init__.py
    └── setup.py // setup to build the wheel
使用python执行入站适配器,使用grongier.pex.InboundAdapter子类,覆盖OnTask()方法。
使用python执行出站适配器,使用grongier.pex.OutboundAdapter子类,实现所需action方法。
使用python执行业务服务组件,使用grongier.pex.BusinessService子类,覆盖OnProcessInput()方法。
使用python执行业务流程组件,使用grongier.pex.BusinessProcess子类,覆盖 OnRequest(), OnResponse() and OnComplete()方法。
使用python执行业务流程组件,使用grongier.pex.BusinessOperation子类,覆盖 OnMessage()方法。
启动一个嵌入式python shell:
/usr/irissys/bin/irispython
然后使用这个类方法将一个新的py文件添加到组件列表中,以实现互操作性。
iris.cls("Grongier.PEX.Utils").RegisterComponent(<ModuleName>,<ClassName>,<PathToPyFile>,<OverWrite>,<NameOfTheComponent>)
例如 :
iris.cls("Grongier.PEX.Utils").RegisterComponent("MyCombinedBusinessOperation","MyCombinedBusinessOperation","/irisdev/app/src/python/demo/",1,"PEX.MyCombinedBusinessOperation")
如果你不想使用RegisterComponent,你可以添加一个Grongier.PEX.Business*组件并配置其属性
例如 :
大部分代码来自Mo Cheng和Summer Gerry的PEX for Python。
注册部分来自于尚未发布的IRIS 2021.3的功能。
听IRIS 专家聊IRIS,学技术,练英语听力,尽在Intersystems 系联在线培训广播电台
https://datapoints.intersystems.com.
21. Embedded Python — Released February 3, 2022
20. The InterSystems Kubernetes Operator — Released July 27, 2021 [Transcript available]
19. What's New in Version 2021.1 of InterSystems IRIS? — Released June 3, 2021
18. The InterSystems IRIS® FHIR® Accelerator Service — Released May 5, 2021
17. The Analytics & AI Landscape — Released April 6, 2021
16. A Cloud DBMS Visionary — Released January 27, 2021
15. Writing ObjectScript in VS Code — Released November 17, 2020
亲爱的社区开发者们,大家好!
欢迎积极参与新一轮InterSystems开发者竞赛!
这次我们聚集Python!
竞赛时间: 2022年2月7日 - 27日
奖金总额: $10000 - 更多获奖机会!
Hi 开发者们,
New video is already on InterSystems Developers YouTube:
⏯ Embedded Python for ObjectScript Developers: Working with Python and ObjectScript Side-By-Side
<iframe src="//player.bilibili.com/player.html?aid=892887041&bvid=BV1fP4y177XF&cid=478516671&page=1" width="400" height="300" scrolling="no" border="0" frameborder="no" framespacing="0" allowfullscreen="true"> </iframe>
深入指导如何将Python与ObjectScript并排使用,包括:
🗣 主讲人: @Bob Kuszewski Product Manаger, Developer Experience, InterSystems
祝您观看愉快,并请继续关注
包含各种Python代码的项目模版,可用于InterSystems IRIS 社区容器版Community Edition with container。
特性 :
这个 repo已经docker化,你可以clone/git 把repo拉到任何本地目录下
git clone https://github.com/grongierisc/iris-python-template.git
打开该目录下的终端并执行:
docker-compose up -d
并为记事本Notebooks打开 http://localhost:8888/tree
或, 在VSCode打开克隆的目录, 启动docker-compose 并通过VSCode 菜单打开URL:

确保安装好 git and Docker desktop
这个repository 已经可以开始在带ObjectiveScript 插件的VSCode中编写代码. 安装 VSCode, Docker and ObjectScript 插件并打开文件夹.
打开 /src/ObjectScript/Embedded/Python.cls 类并开始尝试变更 - 它会在运行IRIS docker container容器中被编译.
最简单的方法是在容器中运行VsCode.
要连上一个 Docker container, 要么从命令板中选择 Remote-Containers: Attach to Running Container... (kbstyle(F1)) 或者使用在活动Activity条中选择 Remote Explorer 并从 Containers 视图中选择 Attach to Container动作在你希望连接的容器上.

然后配置你的python 解析器 /usr/irissys/bin/irispython

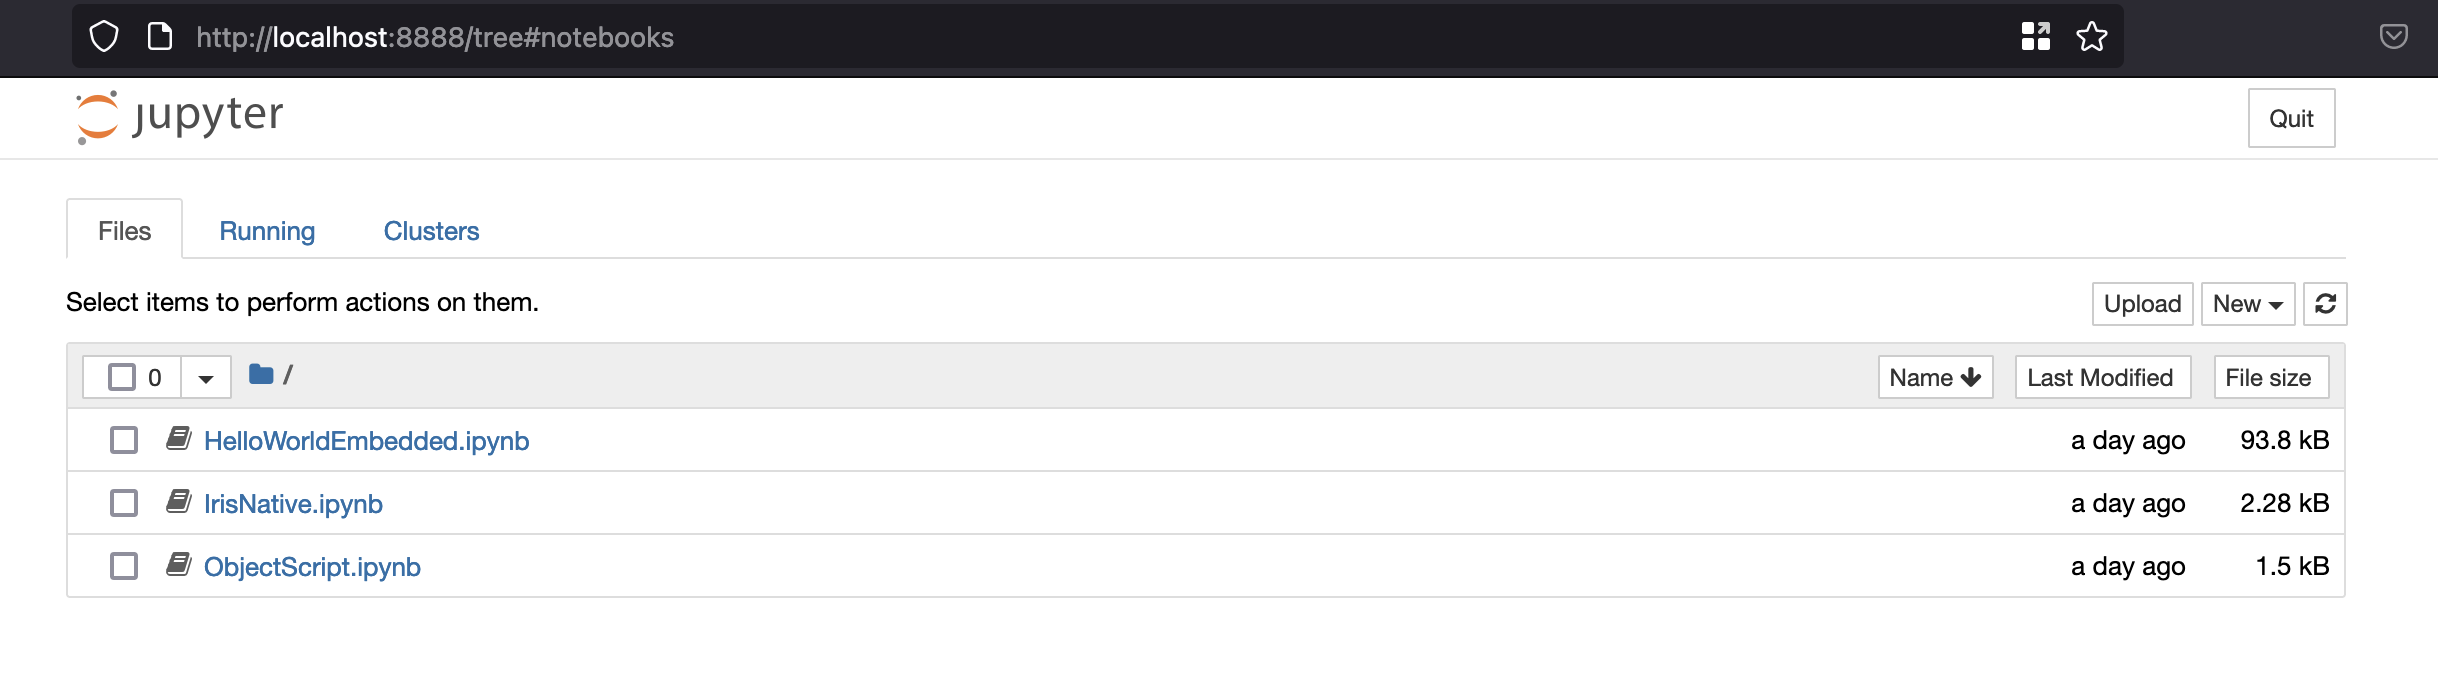
打开这个网址 : http://localhost:8888/tree
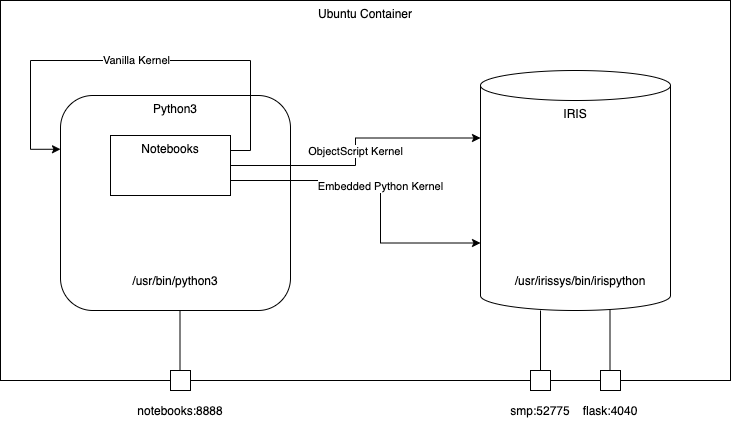
你可以用三个不同的内核访问三个不同的notebooks
一个安装了某些python 依赖 (pip, venv) 和 容器Sudo的dockerfile 以方便使用. 接下来创建开发目录并拷贝在这个 git repository里
启动IRIS 并倒入Titanics csv 文件, 然后激活 %Service_CallIn for Python Shell. 使用相关的docker-compose.yml 文件来轻松设置另外的参数如 port number 以及你在哪里配置 keys 和host 文件夹.
dockerfile 以安装python模块所需要的东西为终止.
最后一部分是关于安装jupyter notebook记事本和它的内核.
使用 .env/ 文件 来调整在docker-compose里面使用到的dockerfile.
配置文件可以马上用 VSCode ObjectScript plugin开始编程
配置文件如果你想用VSCode ObjectScript debug.
Read about all the files in this article
如果你想在容器中运行VSCode添加拓展建议的文档.

这在使用embedded python非常有用.
这个文件夹被分成两部分, one 用来保存 ObjectScript 样例,另一个保存Python 代码.
显示如何在IRIS中使用python的不同部分代码.
所有的注释(都是用法文写的因为是法国人编的代码。。。).
/// Embedded python example
Class ObjectScript.Embbeded.Python Extends %SwizzleObject
{

/// HelloWorld with a parameter
ClassMethod HelloWorld(name As %String = "toto") As %Boolean [ Language = python ]
{
    print("Hello",name)
    return True
}

/// Description
Method compare(modèle, chaine) As %Status [ Language = python ]
{
    import re

    # compare la chaîne [chaîne] au modèle [modèle]
    # affichage résultats
    print(f"\nRésultats({chaine},{modèle})")
    match = re.match(modèle, chaine)
    if match:
        print(match.groups())
    else:
        print(f"La chaîne [{chaine}] ne correspond pas au modèle [{modèle}]")
}

/// Description
Method compareObjectScript(modèle, chaine) As %Status
{
    w !,"Résultats("_chaine_","_modèle_")",!
    set matcher=##class(%Regex.Matcher).%New(modèle)
    set matcher.Text=chaine
    if matcher.Locate() {
        write matcher.GroupGet(1)
    }
    else {
        w "La chaîne ["_chaine_"] ne correspond pas au modèle ["_modèle_"]"
    }
}

/// Description
Method DemoPyhtonToPython() As %Status [ Language = python ]
{
    # expression régulières en python
    # récupérer les différents champs d'une chaîne
    # le modèle : une suite de chiffres entourée de caractères quelconques
    # on ne veut récupérer que la suite de chiffres
    modèle = r"^.*?(\d+).*?$"

    # on confronte la chaîne au modèle
    self.compare(modèle, "xyz1234abcd")
    self.compare(modèle, "12 34")
    self.compare(modèle, "abcd")
}

Method DemoPyhtonToObjectScript() As %Status [ Language = python ]
{
    # expression régulières en python
    # récupérer les différents champs d'une chaîne
    # le modèle : une suite de chiffres entourée de caractères quelconques
    # on ne veut récupérer que la suite de chiffres
    modèle = r"^.*?(\d+).*?$"

    # on confronte la chaîne au modèle
    self.compareObjectScript(modèle, "xyz1234abcd")
    self.compareObjectScript(modèle, "12 34")
    self.compareObjectScript(modèle, "abcd")
}

/// Description
Method DemoObjectScriptToPython() As %Status
{
    // le modèle - une date au format jj/mm/aa
    set modèle = "^\s*(\d\d)\/(\d\d)\/(\d\d)\s*$"
    do ..compare(modèle, "10/05/97")
    do ..compare(modèle, " 04/04/01 ")
    do ..compare(modèle, "5/1/01")
}

}
set demo = ##class(ObjectScript.Embbeded.Python).%New()

zw demo.DemoPyhtonToPython()
显示如何用gateway功能调用外部python 代码的ObjectiveScritp 类.
在这个栗子中python 代码并不在同一IRIS进程中“被执行”.
/// Description
Class Gateway.Python
{

/// Demo of a python gateway to execute python code outside of an iris process.
ClassMethod Demo() As %Status
{
    Set sc = $$$OK

    set pyGate = $system.external.getPythonGateway()

    d pyGate.addToPath("/irisdev/app/src/Python/gateway/Address.py")

    set objectBase = ##class(%Net.Remote.Object).%New(pyGate,"Address")

    set street = objectBase.street

    zw street

    Return sc
}

}
显示如何在IRIS中使用嵌入式embedded python的不同部分的python 代码.
所有的注释(都是用法文写的因为是法国人编的代码。。。)
import iris

person = iris.cls('Titanic.Table.Passenger')._OpenId(1)

print(person.__dict__)
首先倒入iris 模块来启用 嵌入式embedded python 能力.
从IRIS模块中打开一个带cls功能的持久化类 class.
请注意所有 % 功能被替换为 _.
你需要使用shell来运行这个例子 :
/usr/irissys/bin/irispython /opt/irisapp/src/Python/embedded/demo.py
显示如何在python代码中使用native api .
import irisnative

# create database connection and IRIS instance
connection = irisnative.createConnection("localhost", 1972, "USER", "superuser", "SYS", sharedmemory = False)
myIris = irisnative.createIris(connection)

# classMethod
passenger = myIris.classMethodObject("Titanic.Table.Passenger","%OpenId",1)
print(passenger.get("name"))

# global
myIris.set("hello","myGlobal")
print(myIris.get("myGlobal"))
为了倒入 irisnative, 你需要在python环境中安装 native api wheels.
pip3 install /usr/irissys/dev/python/intersystems_irispython-3.2.0-py3-none-any.whl
然后你可以执行python代码
/usr/bin/python3 /opt/irisapp/src/Python/native/demo.py
请注意在这个例子中有一个连接是练到IRIS数据库的, 这意味着, 这个代码是在另一个不同的IRIS 线程中被执行.
一个完整的结合嵌入式embedded python和微框架flask的demo. 你可以测试一下 :
GET http://localhost:4040/api/passengers?currPage=1&pageSize=1
为了使用嵌入式embedded Python, 我们使用 irispython 作为python 解析 并do:
import iris
就在文件的最开头.
我们将能够运行如下的方法methods:
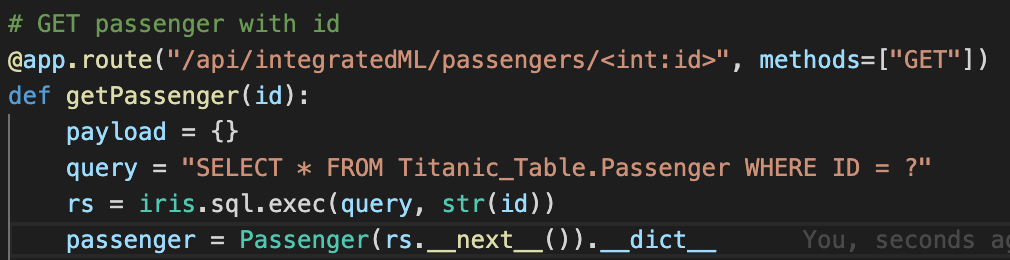
正如你们看到的,为了 GET passenger 的 ID, 我们需要执行查询并使用它的结果集.
我们也可以直接用IRIS的对象:
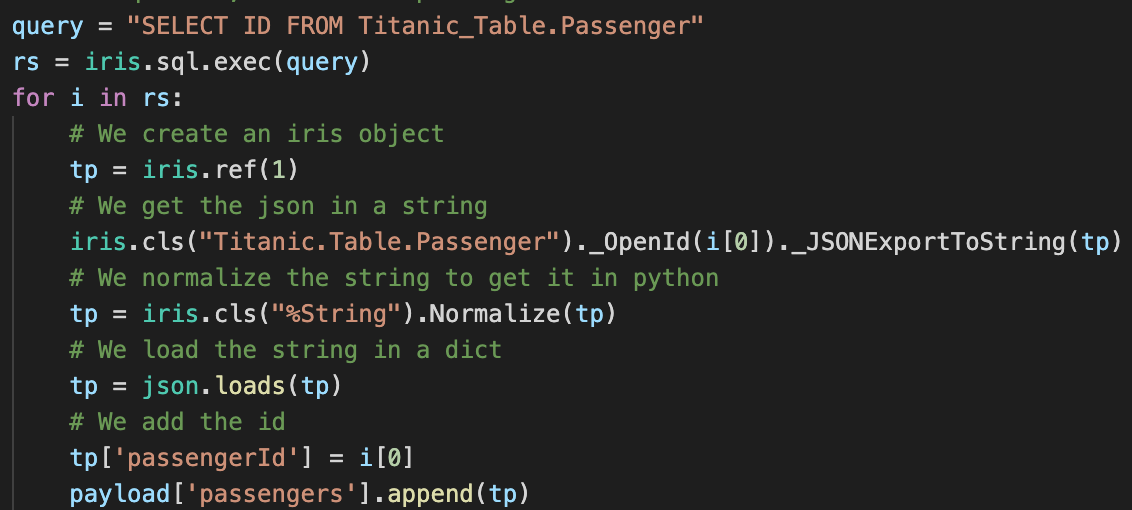
在这里, 我们使用SQL 查询来获得所有表里的 ID, 并从Titanic.Table.Passenger 类带有 %OpenId() 方法method的表里获取每个passenger (请注意由于 % 在 Python是非法字符, 我们用下划线 _ 来代替).
感谢Flask, 我们已经这样完成了所有的方法和路线.
为了启动服务器, 我们用 gunicorn 和 irispython.
在 docker-compose 文件里, 我们增加了下面的行:
iris:
  command: -a "sh /opt/irisapp/server_start.sh"
这会在容器启动后(感谢 -a flag), 启动以下脚本:
#!/bin/bash

cd ${SRC_PATH}/src/Python/flask

${PYTHON_PATH} -m gunicorn --bind "0.0.0.0:8080" wsgi:app &

exit 1
Dockerfile 里的环境参数如下:
ENV PYTHON_PATH=/usr/irissys/bin/irispython
ENV SRC_PATH=/opt/irisapp/
带有三种不同内核的三个不同的记事本Notebooks :
记事本Notebooks 在这里访问 http://localhost:8888/tree
这个是使用IRIS 嵌入式embedded python 内核的记事本notebook .
它展示了打开和保存持久化类和如何执行sql 查询.
这个notebook使用 vanilla python 内核.
它展示了如何执行IRIS原生 native apis.
这个notebook 使用 ObjectScript 内核kernel.
它展示了如何运行ObjectSCript代码以及如何在ObjectScript 中使用嵌入式embedded python.
您可能已经听说,我们目前正在为所有正在使用 Caché 和 Ensemble 的客户提供限时免费迁移到我们的下一代数据平台 InterSystems IRIS 的机会。
虽然我们依旧如往常一样全力支持那些正在使用 Caché 数据库和 Ensemble 集成引擎的客户,但我们还是认为 InterSystems IRIS 是未来的关键。它结合了 Caché 和 Ensemble 的所有功能,并添加了大量令人兴奋的强大功能,从机器学习到原生 Python。
这也正是我们为现有客户提供迁移到 InterSystems IRIS 并使用这些新功能的原因。 我们也通过就地迁移支持轻松迁移,这意味着无需数据库转换、分步迁移指南、教程等。
听起来挺有趣对吗? 以下是我针对当前 Caché 和 Ensemble 应迁移到 InterSystems IRIS 的五个主要原因。
如果一张图片胜过千言万语,那么一段视频又价值几何? 当然胜过敲一个帖子。
请在 InterSystems Developers YouTube 观看我的“Coding talks”:
1. 使用 Yape 分析 InterSystems IRIS 系统性能。 第 1 部分:安装 Yape
在容器中运行 Yape。
2. Yape 容器 SQLite iostat InterSystems
提取和绘制 pButtons 数据,包括时间范围和 iostat。
如果您需要一个简单的方法来捕获和查看 Caché 和 IRIS 以及系统性能指标,可以安排每天运行 pButtons 来轻松实现。 我之前写过这方面的文章。
我经常需要查看客户系统以进行容量规划和性能检查,这就是我编写 Yape 并在 GitHub 上提供它的原因。 我的 InterSystems 同事 Fabian 将 Yape 的内部结构带入了新方向,并使其正式在容器中运行。 Fabian 已经离开 InterSystems,但我继续在 GitHub 上进行开源开发。 在过去一个月左右的时间里,我修复了一些操作系统命令格式错误,使日期处理更智能,在 vmstat 中添加了“Total CPU”图表(倒着看“id”导致我的脖子拉伤),以及其他修饰性更改。
如果您想为 Yape 做出贡献,它在 GitHub 上是开源的。 如果您有功能要求,请通过建议页面告诉我。
另外,请查看 Open Exchange 上的 Yape 应用程序。
在接下来的几个月,我将分享工作流程中的其他一些技巧,并期望继续开发以使呈现的数据更加有用。 Yape 非常适合检查和查看昨天或过去一周发生的事件的趋势,但是您还需要实时监视和警报... 这里我也对将来的一些帖子做个预告 ;)
关键字:Python,JDBC,SQL,IRIS,Jupyter Notebook,Pandas,Numpy ,机器学习
这是一个用于演示的 5 分钟快速笔记,通过 Jupyter Notebook 中的 Python 3 调用 IRIS JDBC 驱动程序,以经由 SQL 语法从 IRIS 数据库实例读取数据和向 IRIS 数据库实例写入数据。
去年,我发表了关于将 Python 绑定到 Cache 数据库的简要笔记(第 4.7 节)。 如何使用 Python 挂入 IRIS 数据库以将其数据读入 Pandas 数据框和 NumPy 数组进行常规分析,然后再将一些经过预处理或标准化的数据写回 IRIS 中,准备进一步用于 ML/DL 管道,现在可能是时候回顾一些选项和讨论了。
一些立即浮现的快速选项:
这里有漏掉其他选项吗? 我有兴趣尝试任何选项。
我们是不是应该从普通的 JDBC 方法开始? 下一个快速笔记将总结 ODBC、Spark 和 Python Native API。
此快速演示涉及以下常见组件:
本快速笔记不会涉及以下内容,但它们也很重要,可以使用特定的站点解决方案、部署和服务单独解决:
我只运行了一个 IRIS 2019.4 容器,作为“远程”数据库服务器。 您可以使用任何您有权利访问的 IRIS 实例。
zhongli@UKM5530ZHONGLI MINGW64 /c/Program Files/Docker Toolbox
$ docker ps
CONTAINER ID IMAGE COMMAND CREATED STATUS PORTS NAMES
d86be69a03ab quickml-demo "/iris-main" 3 days ago Up 3 days (healthy) 0.0.0.0:9091->51773/tcp, 0.0.0.0:9092->52773/tcp quickml
我们将在笔记本电脑中重用相同的设置方法,这里对应 Anaconda(第 4.1 节),这里对应 Jupyter Notebook(第 4 节)。 Python 3.x 在这一步安装。
!conda install --yes -c conda-forge jaydebeapiJayDeBeApi 在撰写本文时(2020 年 1 月)使用 JPype 0.7,该版本由于一个已知错误无法运行,必须降级为 0.6.3
!conda install --yes -c conda-forge JPype1=0.6.3 --force-reinstall这里有一个正式的使用 JDBC 连接到 IRIS 的文档。
对于通过 JDBC 执行 Python SQL,我以下面的代码为例。 它连接到此 IRIS 实例的“USER”命名空间内的数据表“DataMining.IrisDataset”。
### 1. Set environment variables, if necessary<br>#import os<br>#os.environ['JAVA_HOME']='C:\Progra~1\Java\jdk1.8.0_241'<br>#os.environ['CLASSPATH'] = 'C:\interSystems\IRIS20194\dev\java\lib\JDK18\intersystems-jdbc-3.0.0.jar'<br>#os.environ['HADOOP_HOME']='C:\hadoop\bin' #winutil binary must be in Hadoop's Home### 2. Get jdbc connection and cursor<br><strong>import jaydebeapi<br>url = "jdbc:IRIS://192.168.99.101:9091/USER"<br>driver = 'com.intersystems.jdbc.IRISDriver'<br>user = "SUPERUSER"<br>password = "SYS"</strong><br>#libx = "C:/InterSystems/IRIS20194/dev/java/lib/JDK18"<br><strong>jarfile = "C:/InterSystems/IRIS20194/dev/java/lib/JDK18/intersystems-jdbc-3.0.0.jar"</strong>conn = jaydebeapi.connect(driver, url, [user, password], jarfile)<br>curs = conn.cursor()### 3. specify the source data table<br><strong>dataTable = 'DataMining.IrisDataset'</strong>### 4. Get the result and display<br><strong>curs.execute("select TOP 20 * from %s" % dataTable)<br>result = curs.fetchall()<br>print("Total records: " + str(len(result)))<br>for i in range(len(result)):<br> print(result[i])</strong>### 5. CLose and clean - I keep them open for next accesses.<br><strong>#curs.close()<br>#conn.close()</strong>Total records: 150 (1, 1.4, 0.2, 5.1, 3.5, 'Iris-setosa') (2, 1.4, 0.2, 4.9, 3.0, 'Iris-setosa') (3, 1.3, 0.2, 4.7, 3.2, 'Iris-setosa') ... ... (49, 1.5, 0.2, 5.3, 3.7, 'Iris-setosa') (50, 1.4, 0.2, 5.0, 3.3, 'Iris-setosa') (51, 4.7, 1.4, 7.0, 3.2, 'Iris-versicolor') ... ... (145, 5.7, 2.5, 6.7, 3.3, 'Iris-virginica') ... ... (148, 5.2, 2.0, 6.5, 3.0, 'Iris-virginica') (149, 5.4, 2.3, 6.2, 3.4, 'Iris-virginica') (150, 5.1, 1.8, 5.9, 3.0, 'Iris-virginica')
测试表明 JDBC 上的 Python 可以正常运行。 以下只是常规 ML 管道的一些常规数据分析和预处理,由于我们可能会在后续的演示和比较中反复涉及,因此为方便起见在这里附上。
如果还没有安装 Pandas 和 NumPy 软件包,可以通过 Conda 安装,类似于上面 3.3 节。
然后运行以下示例:
我们例行查看一下当前数据:


现在,我们得到了一个 DataFrame,以及一个来自源数据表的标准化 NumPy 数组。
当然,我们在这里可以尝试各种常规分析,一个 ML 人员会按照下述步骤开始,在 Python 中替换 R(链接)。

当然,我们可以像往常一样将数据拆分为训练集和验证集或测试集,然后将它们写回临时数据库表,实现 IRIS 一些即将推出的精彩 ML 功能:
现在,如果切换到 IRIS 管理控制台或终端 SQL 控制台,应该看到已创建 2 个临时表:120 行的 TRAIN02 和 30 行的 TEST02。
那么本篇快速笔记到这里就结束了。
我们将使用 IRIS 的 PyODBC、PySPark 和 Python Native API 替换第 3.3 和 3.4 节。除非有人愿意帮忙编写一篇快速笔记,我也将对此不胜感激。
本文将展示如何把 InterSystems IRIS 数据库与 Python 集成,以服务于自然语言处理 (NLP) 的机器学习模型。
随着在世界范围内的广泛采用和使用,Python 拥有了出色的社区,以及许多加速器 | 库用于部署任何类型的应用。 如果您感兴趣,请访问 https://www.python.org/about/apps/
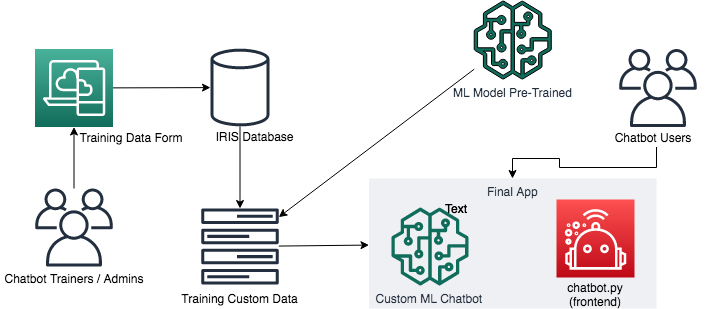
我接触到 ^globals 后很快就熟悉了,它们可以用作快速获取现成数据模型中数据的方法。 因此,首先,我将使用 ^globals 存储训练数据和对话以记录聊天机器人的行为。
自然语言处理或 NLP 是 AI 的一个主题,它创造了机器从我们的语言阅读、理解含义的能力。 显然,这并不简单,但是我将展示如何在这个广阔而美丽的领域中迈出您的第一步。
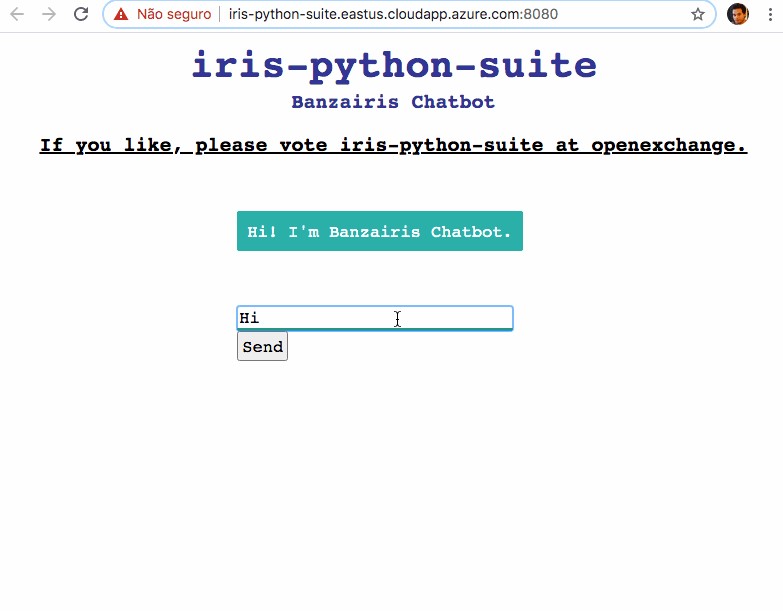
我在这里部署了 Chatbot 应用作为演示: http://iris-python-suite.eastus.cloudapp.azure.com:8080
首先要知道与普通软件开发相比,机器学习具有不同的范式。 很难理解的要点是机器学习模型的开发周期。
浅显解释预警
一个标准的应用开发周期大概是这样:
开发代码 -> 测试(使用开发数据)-> 部署(真实用户数据)
机器学习代码本身不具有相同的价值。 它会与数据分担责任! 而且不是任意数据,是真实数据! 因为待执行的最终代码是由开发概念和所用数据合并生成。 所以机器学习应用周期类似于:
开发(训练)模型 + 真实数据 -> 验证 -> 部署此模型的结果
训练模型的技术有很多,每种情况和目标都需要很大的学习曲线。 在本例中,我使用的是 ChatterBot 库,该库封装了一些技术,并提供了训练方法和经过预处理的训练数据,有助于我们关注结果。
您可以由此开始拥有一个基本的会话聊天机器人。 您还可以创建所有数据来训练您的聊天机器人,全面满足您的需求,但这在短时间内很难完成。 在这个项目中,我使用 en_core_web_sm 作为对话的基础,并与可以通过表单创建的自定义训练数据合并
在这个应用环境中,我使用了 Python 3.7 和这些模块:
本项目具有简单易懂的结构。 在主文件夹上,有 3 个最重要的子文件夹:
现在,可以在 ./app 目录下看到一些文件:
此应用使用 Intersystems IRIS 作为存储库,使用的 globals 包括:
我没有为所有对话创建报告,但这不是什么问题,使用全局图形查看器即可跟踪对话。

使用 docker-compose,您可以在一个环境中将所有组件和配置轻松转到 iris-python-covid19 文件夹,键入:
$ docker compose build
$ docker compose up
第一次运行将通过网络链接下载图像和依赖项。 如果持续时间超过 15 分钟,那可能是出现了问题,请随时来这里留言。 第一次运行后,下一次运行会好很多,只需要不到 2 分钟。
一段时间后,您可以打开浏览器并转到地址:
训练数据表单
http://localhost:8050/chatbot-training-data
聊天机器人
http://localhost:8080
我暂时使用的是 USER 命名空间
http://localhost:9092
user: _SYSTEM
pass: theansweris42
此应用目前正在参与 Open Exchange 竞赛,您可以在这里给我的应用 iris-python-suite 投票 (https://openexchange.intersystems.com/contest/current)
在本篇短文中,我们将讨论如何让 Yape 在 docker 容器中运行,从而避免在本地计算机上安装设置 python。
距离本系列的上一篇文章已经有一段时间了,让我们快速回顾一下。
我们讨论了使用 matplotlib 创建基本图形。 之后我们介绍了使用 bokeh 生成动态图形。 在第三部分中,我们讨论了使用 monlbl 数据生成热图。
在通过各种渠道获得的反馈中,有一个相同的难题是设置一个环境来运行上面的例子。 所以我们决定让实现变得更容易一些,我与 Murray 合作为他的优秀工具 Yape 创建了一个 Dockerfile。 Github 页面
当然,您必须在您的计算机上安装并运行 docker。
一个相当简单的基于官方 python 映像的 docker 定义:
FROM python:3

WORKDIR .

COPY requirements.txt ./
RUN pip install --no-cache-dir -r requirements.txt

COPY . .
Requirements.txt 包含运行 yape 所需的包:
altgraph==0.10.2
py-dateutil==2.2
bdist-mpkg==0.5.0
certifi==2017.7.27.1
cffi==1.10.0
chardet==3.0.4
idna==2.5
bokeh==0.12.6
macholib==1.5.1
matplotlib==2.0.2
pandas==0.20.3
modulegraph==0.10.4
numpy==1.13.1
py2app==0.7.3
pycparser==2.18
pyparsing==2.0.1
python-dateutil==1.5
pytz==2013.7
requests==2.18.3
six==1.4.1
urllib3==1.22
zope.interface==4.1.1
要构建映像,只需从github 中check out,然后运行 docker build:
git clone https://github.com/murrayo/yape.git
docker build -t yape .
(在pull request被合并之前,使用 https://github.com/kazamatzuri/yape.git)
这将需要几分钟的时间,具体取决于您的计算机/互联网连接的速度。
之后可以使用如下命令对 pButtons 文件运行 yape:
docker run -v `pwd`/in:/data  --rm --name yape-test yape  \
./extract_pButtons.py -o /data \
/data/pButtons.html

docker run -v `pwd`/in:/data  --rm --name yape-test yape  \
./graph_pButtons.py -o /data/charts /data
我们在当前工作目录中使用
/in
并将其映射到容器中的 /data。 我们将从该目录获得 pButtons.html,同时图形也将输出到该目录。
我必须向脚本添加参数,我们要将它们合并到官方 yape 仓库中(pull request)